I recently received my long awaited Savannah Stoker. Thought I’d write it up!
The Savannah Stoker is a new product that is still under final development. The Development Team can be found at the Pelletheads website, specifically check out the Savannah Stoker thread. You can also follow the Savannah Stoker Facebook page.
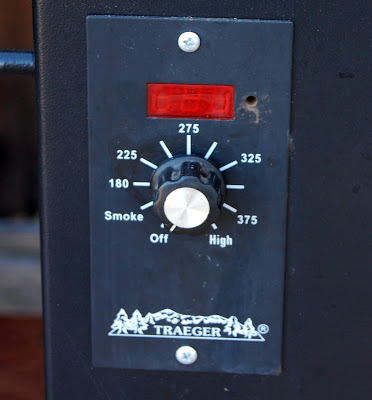
The Savannah Stoker is a drop-in replacement for the analog and digital controllers used on Traeger Grills. The goal of this product is to allow finer control of the temperatures, while giving greater control over the auger, fan and general operations.
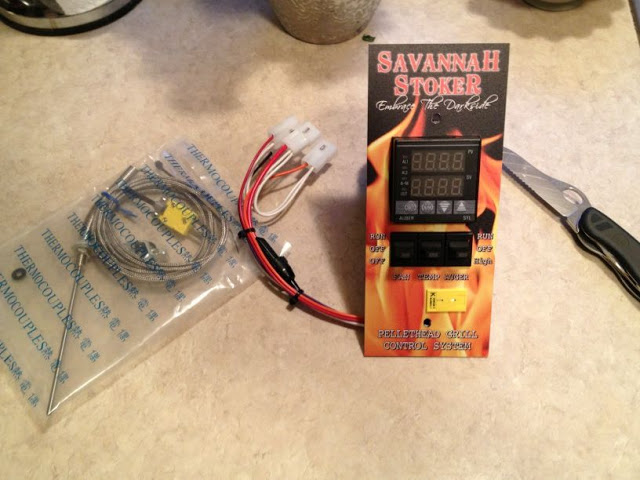
Upon unboxing, I found the following:
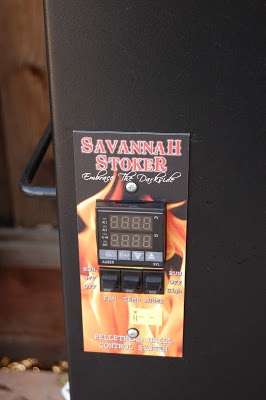
- Savannah Stoker controller, including integrated wiring harness for Traeger grills, with a colorful faceplate.
- Bag containing the new temperature probe, some screws, washers, and a zip tie
- A copy of the manual for the Auberins SYL-2372 PID controller module, upon which this product is based.
Tools needed:
- Phillips screwdriver
- small “jewelers” style flat blade screwdriver (needed only when replacing digital controllers, not needed for older non-digital controllers)
- Small diagonal cutters or scissors to cut zip ties
Installation:
First: UNPLUG YOUR TRAEGER!!! The Traeger controller runs off 110V power, and all of the components run off 110V power, so almost every wire connector you will be touching is potentially HOT. Unplug the Traeger, and turn on the controller to double check that it in fact is unplugged.
First to remove my “old” Traeger 180 digital controller:
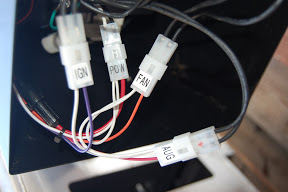
Identify the connectors: First, go underneath the controller (lying on your back is simple enough to get access). Identify the 2-wire molex connectors and remove them. You may want to identify what each is connected to.
- Power can be identified by finding the GREEN ground wire. The power connector comes from the same component as the ground wire. You can verify this as the power cord should route up into the back side of the same component as the green ground wire and the power molex connector.
- Auger can be identified by finding the small fan and motor that is OPPOSITE the main body.
- The fan is the medium sized fan that blows up, and can easily be seen from the bottom. Find the cable that connects to it.
Remove all of the 2-wire molex connectors.
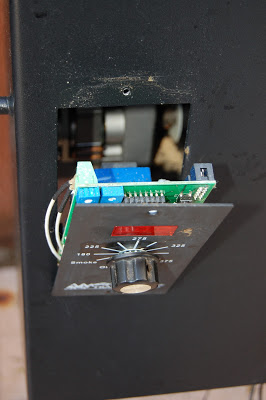
Remove the two screws that secure the old controller. In order to remove the controller, you are going to need a simple, standard sized Phillips head screwdriver. The controller is held in by two screws, which you will want to hold onto until after you are finished, as you may want to use them to attach the new controller.
Remove unit: You may need to slide to the right or down, depending on the model of Traeger controller. Don’t force it
Undo the thermal wires from the digital controller.
Put the new controller in place: In the enclosed bag, there are 2 screws, to black stainless washers. Tie the old RTD wire up and out of the way with the black zip tie. Attach the top screw, then bottom, using the new screws if possible. Due to variations in what Traeger ships, and the variations in screw hole sizes, you may do better with your old screws.
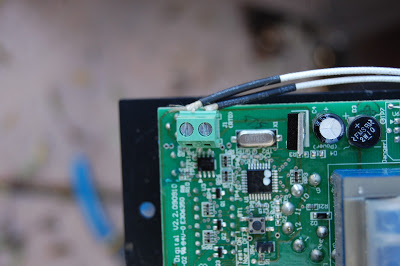
Connect labeled connectors to proper locations. You will test these at the end of the installation.
Place the new PID probe in the grill. You can place it anywhere, near whatever food ou are cooking. Keep it away from the direct hot air flow near the front and back of the grill. Common attachmeht points are near the center grill or connected to the RTD.
I ran my PID wire to exit the grill up by the left hing, and then down the back, out of the way, underneath and up to the controller. I plan at a future date on disassembling the plug end of the wire, routing it through the old temperature probe hole, and reassembling it.
Verification and Startup:
Note the labels: Left side: RUN OFF OFF settings for the FAN, Temp switch in the middle, and auger settings RUN OFF HIGH (aka Override)
Note: If any verification fails, unplug the unit, and check your molex connections. You probably have a loose connection or connected the wrong connectors. The Savannah Stoker ships with clearly labeled connectors.
- Place all three switches in center OFF position
- Plug the grill into the power outlet
- Fan Verification: Flip fan switch to up, see the green light and hear the fan
- Flip fan switch down, see the red light, fan is off. Return fan switch to center.
- Auger Verification: Flip the auger switch down, red light, hear auger run, flip back up to run, green light but auger off
- Make sure temp probe is plugged in, placed in position
- Startup: Fan switch up, Temp switch up. Top display will blink and then show current grill temp, bottom is “set” or target temp.
- Grill is starting up, running the ignitor, fan and auger.
For normal operation, just start it at 200 until the smoke indicates a full start, and then set your desired temperature. The default settings should work well for most cases, although I can’t wait to try adjusting the settings that control what used to be the “P” settings on the Traeger.
For shutdown, simply turn auger OFF, and the temp OFF, leaving the fan switch on until the unit is cool to the touch.
As I get more into it, I’ll start to write up the advanced usage like modifying some of the default values.
Pingback: Bill Plein
Pingback: Chuck S. Mayumi
A great write-up Bill. Keep us posted as you continue to use the Savannah Stoker.
Thanks for your writeup. I installed mine today without a hitch and used your suggestions. Thanks to Billy and Savannah Smoker for this fine device.